
Creating a JavaScript testimonial slider for your website can greatly enhance the user experience by showcasing positive feedback in an interactive and visually appealing way. In this article, we’ll guide you through the process of creating a simple yet effective slider using HTML, CSS, and JavaScript. Follow this JavaScript Testimonial Slider Tutorial to get started.
Step 1: Set Up the HTML Structure
First, we’ll create the basic HTML structure for our slider. This will include a container for the slider and individual slides for each testimonial or review.
<!DOCTYPE html>
<html lang="en">
<head>
    <meta charset="UTF-8">
    <meta name="viewport" content="width=device-width, initial-scale=1.0">
    <title>Testimonial Slider</title>
    <link rel="stylesheet" href="styles.css">
</head>
<body>
    <div class="slider-container">
        <div class="slide">
            <p class="testimonial">"This is an amazing product!"</p>
            <p class="author">- John Doe</p>
        </div>
        <div class="slide">
            <p class="testimonial">"I would highly recommend this to everyone."</p>
            <p class="author">- Jane Smith</p>
        </div>
        <div class="slide">
            <p class="testimonial">"A game-changer for our industry."</p>
            <p class="author">- Mike Johnson</p>
        </div>
        <button class="prev" onclick="moveSlide(-1)">❮</button>
        <button class="next" onclick="moveSlide(1)">❯</button>
    </div>
    <script src="scripts.js"></script>
</body>
</html>
Step 2: Style the Slider with CSS
Next, we’ll add some CSS to style the slider and its components. This includes positioning the slides, adding transitions, and styling the navigation buttons.
/* styles.css */
body {
    font-family: Arial, sans-serif;
    display: flex;
    justify-content: center;
    align-items: center;
    height: 100vh;
    margin: 0;
    background-color: #f4f4f4;
}

.slider-container {
    position: relative;
    width: 80%;
    max-width: 600px;
    overflow: hidden;
    background: white;
    box-shadow: 0 4px 10px rgba(0,0,0,0.1);
}

.slide {
    display: none;
    padding: 20px;
    text-align: center;
}

.slide.active {
    display: block;
}

.testimonial {
    font-size: 18px;
    margin-bottom: 10px;
}

.author {
    font-size: 16px;
    color: #555;
}

.prev, .next {
    cursor: pointer;
    position: absolute;
    top: 50%;
    width: auto;
    padding: 16px;
    margin-top: -22px;
    color: white;
    font-weight: bold;
    font-size: 18px;
    transition: 0.6s ease;
    border-radius: 0 3px 3px 0;
    user-select: none;
}

.next {
    right: 0;
    border-radius: 3px 0 0 3px;
}

.prev:hover, .next:hover {
    background-color: rgba(0,0,0,0.8);
}
Step 3: Add the JavaScript Functionality
Finally, we’ll add the JavaScript needed to make the slider functional. This includes functions to navigate between slides and initialize the slider.
// scripts.js
let currentSlide = 0;

function showSlide(index) {
    const slides = document.querySelectorAll('.slide');
    if (index >= slides.length) {
        currentSlide = 0;
    } else if (index < 0) {
        currentSlide = slides.length - 1;
    } else {
        currentSlide = index;
    }
    slides.forEach((slide, i) => {
        slide.style.display = 'none';
        if (i === currentSlide) {
            slide.style.display = 'block';
        }
    });
}

function moveSlide(n) {
    showSlide(currentSlide + n);
}

document.addEventListener('DOMContentLoaded', () => {
    showSlide(currentSlide);
});
Here is the combined code for creating a testimonial slider with HTML, CSS, and JavaScript in a single file:
<!DOCTYPE html>
<html lang="en">
<head>
    <meta charset="UTF-8">
    <meta name="viewport" content="width=device-width, initial-scale=1.0">
    <title>Testimonial Slider</title>
    <style>
        body {
            font-family: Arial, sans-serif;
            display: flex;
            justify-content: center;
            align-items: center;
            height: 100vh;
            margin: 0;
            background-color: #f4f4f4;
        }

        .slider-container {
            position: relative;
            width: 80%;
            max-width: 600px;
            overflow: hidden;
            background: white;
            box-shadow: 0 4px 10px rgba(0,0,0,0.1);
        }

        .slide {
            display: none;
            padding: 20px;
            text-align: center;
        }

        .slide.active {
            display: block;
        }

        .testimonial {
            font-size: 18px;
            margin-bottom: 10px;
        }

        .author {
            font-size: 16px;
            color: #555;
        }

        .prev, .next {
            cursor: pointer;
            position: absolute;
            top: 50%;
            width: auto;
            padding: 16px;
            margin-top: -22px;
            color: white;
            font-weight: bold;
            font-size: 18px;
            transition: 0.6s ease;
            border-radius: 0 3px 3px 0;
            user-select: none;
        }

        .next {
            right: 0;
            border-radius: 3px 0 0 3px;
        }

        .prev:hover, .next:hover {
            background-color: rgba(0,0,0,0.8);
        }
    </style>
</head>
<body>
    <div class="slider-container">
        <div class="slide active">
            <p class="testimonial">"This is an amazing product!"</p>
            <p class="author">- John Doe</p>
        </div>
        <div class="slide">
            <p class="testimonial">"I would highly recommend this to everyone."</p>
            <p class="author">- Jane Smith</p>
        </div>
        <div class="slide">
            <p class="testimonial">"A game-changer for our industry."</p>
            <p class="author">- Mike Johnson</p>
        </div>
        <button class="prev" onclick="moveSlide(-1)">❮</button>
        <button class="next" onclick="moveSlide(1)">❯</button>
    </div>
    <script>
        let currentSlide = 0;

        function showSlide(index) {
            const slides = document.querySelectorAll('.slide');
            if (index >= slides.length) {
                currentSlide = 0;
            } else if (index < 0) {
                currentSlide = slides.length - 1;
            } else {
                currentSlide = index;
            }
            slides.forEach((slide, i) => {
                slide.style.display = 'none';
                if (i === currentSlide) {
                    slide.style.display = 'block';
                }
            });
        }

        function moveSlide(n) {
            showSlide(currentSlide + n);
        }

        document.addEventListener('DOMContentLoaded', () => {
            showSlide(currentSlide);
        });
    </script>
</body>
</html>
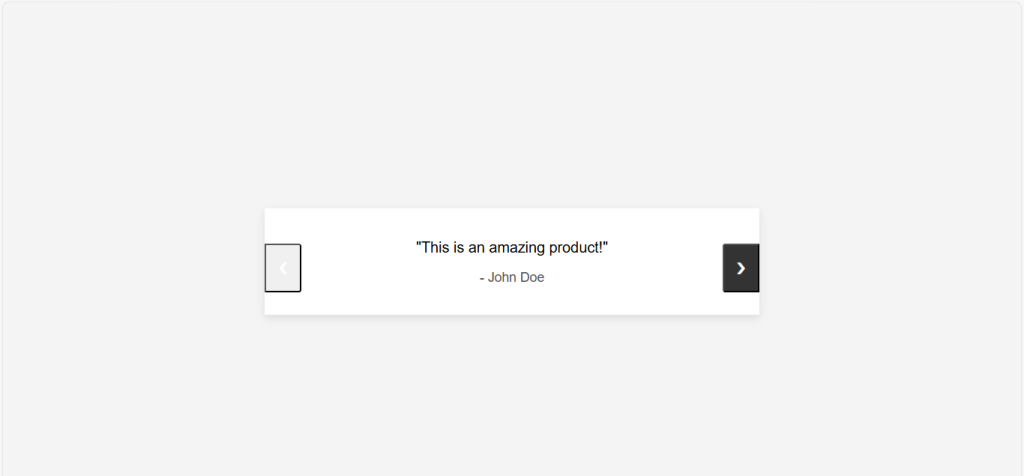
This code sets up a simple testimonial slider. When you open the HTML file in a web browser, you’ll see the testimonials and can navigate between them using the “previous” and “next” buttons. The CSS styles the slider, and the JavaScript handles the functionality for moving between slides.
Here’s the outcome!
Conclusion
Creating a slider for testimonials or reviews using JavaScript is a great way to make your website more interactive and engaging. With a few lines of HTML, CSS, and JavaScript, you can create a dynamic slider that enhances the presentation of user feedback on your site. Follow this JavaScript Testimonial Slider Tutorial to customize the styles and functionality to better suit your needs and branding.
Understanding UIKIT frameworks and comparison