Estimated reading time: 7 minutes
What is a WebView?
A WebView is an embeddable browser that helps a native application, such as Android, to display web content. If you are writing an application that needs to deliver a web content or show a web page as a part of a client application, you can do it smoothly and efficiently using WebView.
According to the Android Studio documentation, the WebView class is an extension of Android’s View class that allows you to display web pages as a part of your activity layout. It does not include any features of a fully developed web browser, such as navigation controls or an address bar. All that WebView does, by default, is show a web page.
In this article, we shall see how to:
- Use Android’s native webView wrapper to load site’s url
- Add and dismiss progressBar
- Utilize the Swipe to refresh feature of Android’s webView.
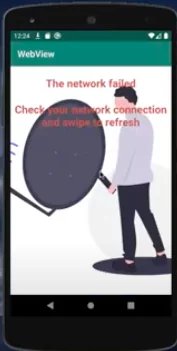
- Add a custom error page on network failure.
Let us begin …
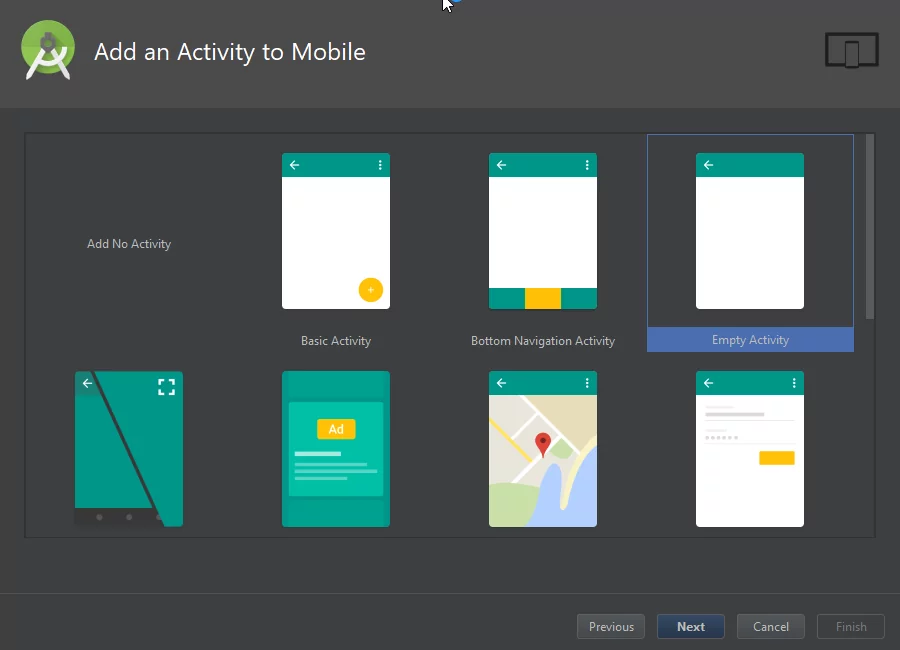
Step 1: Open up your Android Studio and select Empty Activity
Step 2: Add the following dependency in build.gradle file inside the app folder
implementation 'com.google.android.material:material:1.0.0'Step 3: Sync project with gradle files

Step 4: Add the following code to your activity_main.xml file in res->layout folder
<?xml version="1.0" encoding="utf-8"?>
<RelativeLayout
    xmlns:android="http://schemas.android.com/apk/res/android"
    xmlns:app="http://schemas.android.com/apk/res-auto"
    xmlns:tools="http://schemas.android.com/tools"
    android:layout_width="match_parent"
    android:layout_height="match_parent"
    tools:context=".MainActivity">

   <androidx.swiperefreshlayout.widget.SwipeRefreshLayout
       android:id="@+id/swipe"
       android:layout_width="match_parent"
       android:layout_height="match_parent"
       tools:layout_behavior="@string/appbar_scrolling_view_behavior">


       <WebView
           android:id="@+id/web"
           android:layout_width="match_parent"
           android:layout_height="match_parent"/>


   </androidx.swiperefreshlayout.widget.SwipeRefreshLayout>


    <ProgressBar
        android:id="@+id/progress"
        android:layout_width="wrap_content"
        android:layout_height="match_parent"
        android:layout_centerVertical="true"
        android:layout_centerHorizontal="true"
        style="?android:attr/progressBarStyle"
        />

</RelativeLayout>
Step: 5 We will go to our MainActivity.java file and add the code to display the WebView
public class MainActivity extends AppCompatActivity {

    WebView webView;
    ProgressBar progressBar;
    SwipeRefreshLayout swipeRefreshLayout;

    @SuppressLint("SetJavaScriptEnabled")
    @Override
    protected void onCreate(Bundle savedInstanceState) {
        super.onCreate(savedInstanceState);
        setContentView(R.layout.activity_main);

        getSupportActionBar().hide();

        webView = findViewById(R.id.web);
        progressBar = findViewById(R.id.progress);
        swipeRefreshLayout = findViewById(R.id.swipe);


        webView.getSettings().setJavaScriptEnabled(true);
        webView.getSettings().setSupportZoom(false);
        webView.getSettings().setDomStorageEnabled(true);
        webView.setWebViewClient(new myWebViewclient());
        webView.loadUrl("http://codeflarelimited.com");
}
}
Here we setting up our basic WebView and just passing the url we want to wrap. Notice also that we have initialized the SwipeRefreshLayout, and that’s all we are doing here. We need to make it show and dismiss it when the page is fully loaded.
So we add the following code:
 swipeRefreshLayout.setOnRefreshListener(new SwipeRefreshLayout.OnRefreshListener() {
            @Override
            public void onRefresh() {
                swipeRefreshLayout.setRefreshing(true);
                new Handler().postDelayed(new Runnable() {
                    @Override
                    public void run() {
                        swipeRefreshLayout.setRefreshing(false);
                        webView.loadUrl("http://codeflarelimited.com");
                    }
                },  3000);
            }
        });

        swipeRefreshLayout.setColorSchemeColors(
                getResources().getColor(android.R.color.holo_blue_bright),
                getResources().getColor(android.R.color.holo_orange_dark),
                getResources().getColor(android.R.color.holo_green_dark),
                getResources().getColor(android.R.color.holo_red_dark)
        );

    }
Notice we are also using WebViewClient. The WebViewClient allows us to handle navigation inside the WebView and to also handle the various events generated by the WebView. It is also in this WebViewClient block that we want to check for errors, network errors, SSL errors, etc.

We want to be able to handle errors in a nice and responsible way. So we’ll add the following code:
public class myWebViewclient extends WebViewClient{

        @Override
        public boolean shouldOverrideUrlLoading(WebView view, String url) {
            view.loadUrl(url);
            return true;
        }

        @Override
        public void onReceivedError(WebView view, int errorCode, String description, String failingUrl) {
            Toast.makeText(getApplicationContext(), "No internet connection", Toast.LENGTH_LONG).show();
            webView.loadUrl("file:///android_asset/lost.html");
        }

        @Override
        public void onReceivedSslError(WebView view, SslErrorHandler handler, SslError error) {
            super.onReceivedSslError(view, handler, error);
            handler.cancel();
        }

        @Override
        public void onPageStarted(WebView view, String url, Bitmap favicon) {
            super.onPageStarted(view, url, favicon);
            progressBar.setVisibility(View.VISIBLE);
        }

        @Override
        public void onPageFinished(WebView view, String url) {
            super.onPageFinished(view, url);
            progressBar.setVisibility(View.GONE);
        }
    }
Now, let us explain what’s happening here. First we’re handling navigation here within the WebVeiw because of this line of code:
 public boolean shouldOverrideUrlLoading(WebView view, String url) {
            view.loadUrl(url);
            return true;
        }
This ensures that whatever url that is loaded in the WebView opens up in the WebVeiw and does not navigate away or open up chrome or other web browser.
Next, we have the onReceivedError method. This is where we check for error, and to handle that we have created an offline html file that will load when the app encounters a network failure.
Don’t forget to handle Back Navigation for the WebView!
The default behaviour of webView applications, especially in Android, is that once you press the back button it closes the application. But what if we have visited several pages and we want to go back to the previous page?
So we need to handle the back navigation and just say if the webView has previous pages and canGoBack(), let it just goBack(). We’ll add the following code as well:
 @Override
    public boolean onKeyDown(int keyCode, KeyEvent event) {

        if ((keyCode == KeyEvent.KEYCODE_BACK) && webView.canGoBack()) {
            webView.goBack();
            return true;
        }
        return super.onKeyDown(keyCode, event);
    }
Here’s the full code for the MainActvity.java file:
import androidx.appcompat.app.AppCompatActivity;
import androidx.swiperefreshlayout.widget.SwipeRefreshLayout;
import android.annotation.SuppressLint;
import android.graphics.Bitmap;
import android.net.http.SslError;
import android.os.Bundle;
import android.os.Handler;
import android.view.KeyEvent;
import android.view.View;
import android.webkit.SslErrorHandler;
import android.webkit.WebView;
import android.webkit.WebViewClient;
import android.widget.ProgressBar;
import android.widget.Toast;
public class MainActivity extends AppCompatActivity {
WebView webView;
ProgressBar progressBar;
SwipeRefreshLayout swipeRefreshLayout;
@SuppressLint("SetJavaScriptEnabled")
@Override
protected void onCreate(Bundle savedInstanceState) {
super.onCreate(savedInstanceState);
setContentView(R.layout.activity_main);
getSupportActionBar().hide();
webView = findViewById(R.id.web);
progressBar = findViewById(R.id.progress);
swipeRefreshLayout = findViewById(R.id.swipe);
webView.getSettings().setJavaScriptEnabled(true);
webView.getSettings().setSupportZoom(false);
webView.getSettings().setDomStorageEnabled(true);
webView.setWebViewClient(new myWebViewclient());
webView.loadUrl("http://codeflarelimited.com");
swipeRefreshLayout.setOnRefreshListener(new SwipeRefreshLayout.OnRefreshListener() {
@Override
public void onRefresh() {
swipeRefreshLayout.setRefreshing(true);
new Handler().postDelayed(new Runnable() {
@Override
public void run() {
swipeRefreshLayout.setRefreshing(false);
webView.loadUrl("http://codeflarelimited.com");
}
}, 3000);
}
});
swipeRefreshLayout.setColorSchemeColors(
getResources().getColor(android.R.color.holo_blue_bright),
getResources().getColor(android.R.color.holo_orange_dark),
getResources().getColor(android.R.color.holo_green_dark),
getResources().getColor(android.R.color.holo_red_dark)
);
}
public class myWebViewclient extends WebViewClient{
@Override
public boolean shouldOverrideUrlLoading(WebView view, String url) {
view.loadUrl(url);
return true;
}
@Override
public void onReceivedError(WebView view, int errorCode, String description, String failingUrl) {
Toast.makeText(getApplicationContext(), "No internet connection", Toast.LENGTH_LONG).show();
webView.loadUrl("file:///android_asset/lost.html");
}
@Override
public void onReceivedSslError(WebView view, SslErrorHandler handler, SslError error) {
super.onReceivedSslError(view, handler, error);
handler.cancel();
}
@Override
public void onPageStarted(WebView view, String url, Bitmap favicon) {
super.onPageStarted(view, url, favicon);
progressBar.setVisibility(View.VISIBLE);
}
@Override
public void onPageFinished(WebView view, String url) {
super.onPageFinished(view, url);
progressBar.setVisibility(View.GONE);
}
}
@Override
public boolean onKeyDown(int keyCode, KeyEvent event) {
if ((keyCode == KeyEvent.KEYCODE_BACK) && webView.canGoBack()) {
webView.goBack();
return true;
}
return super.onKeyDown(keyCode, event);
}
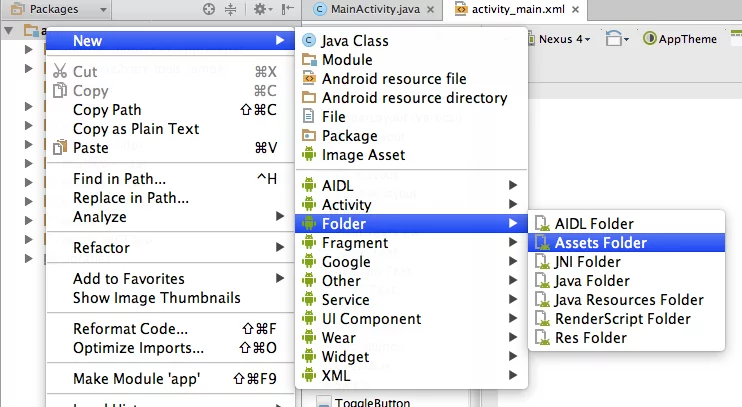
}To Create the lost.html file for the WebView
First, we need to create an assets folder like so:
Next, we create an image folder right inside the assets folder and just put our image there. This image will portray a network failure. I have decided to call my own gone.png. Feel free to use any image of your choice:
Add the following code to the lost.html file
<!DOCTYPE html>
<html lang="en">
<head>
    <meta charset="UTF-8">
    <meta name="viewport" content="width=device-width, initial-scale=1.0">
    <meta http-equiv="X-UA-Compatible" content="ie=edge">
    <title>Connection Failed</title>
    <style>
  body {
  display: inline-block;
  background: #00AFF9 url('img/gone.png') center/cover no-repeat;
  height: 100vh;
  margin: 0;
  color: white;
}

h1 {
  margin: .8em 3rem;
  font: 4em Roboto;
}
p {
  display: inline-block;
  margin: .2em 3rem;
  font: 2em Roboto;
}
 </style>
</head>
<body>
<center>
    <h2 style="text-align:center;padding:5px;color:#d9534f">The network failed</h2>
    <h2 style="text-align:center;padding:5px;color:#d9534f">Check your network connection and swipe to refresh </h2>
</center>

</body>
</html>
See 7 Reasons Why You Should Learn Software Development
Wait, before you run!
You need to add instructions for internet connection in your AndroidManifest.xml file otherwise the webView won’t show. This way we can request permission to use the internet
AndroidManifest.xml
<uses-permission android:name="android.permission.INTERNET"/>Congrats! We’re good to go.